 # 自己实现一个路由
路由原理
前端路由实现起来其实很简单,本质就是监听 URL 的变化,然后匹配路由规则,显示相应的页面,并且无须刷新。目前单页面使用的路由就只有两种实现方式
- hash 模式
- history 模式
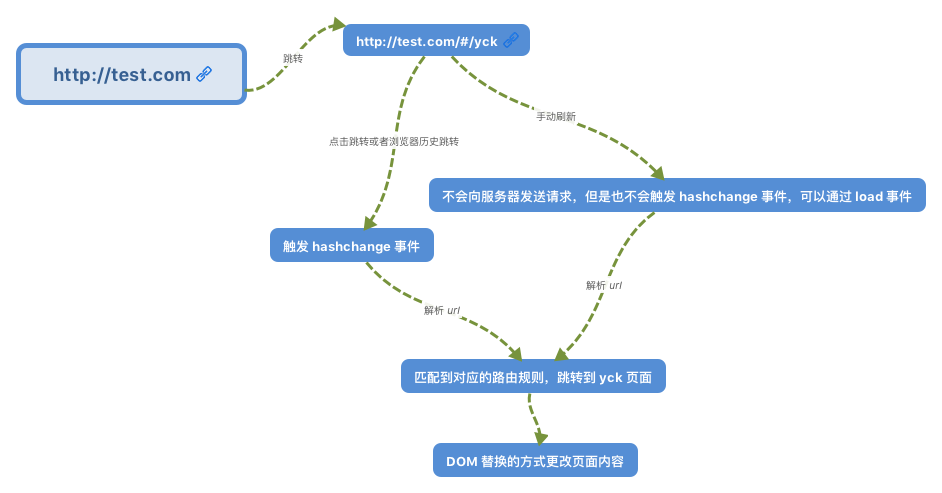
www.test.com/##/ 就是 Hash URL,当 ## 后面的哈希值发生变化时,不会向服务器请求数据,可以通过 hashchange 事件来监听到 URL 的变化,从而进行跳转页面。

History 模式是 HTML5 新推出的功能,比之 Hash URL 更加美观

hash & history 基础
hash
现在的网络应用程序越来越多的使用AJAX异步请求完成页面的无缝刷新,导致浏览器的URL不会发生任何变化而完成了请求,从而破换了用户浏览体验。同时本次浏览的页面内容在用户下次使用URL访问时将无法重新呈现,而解决该问题的一个途径便是使用window.location.hash属性及窗口的onhashchange事件下面具体介绍几个使用过程中必须理解的要点。:
1,散列值浏览器是不会随请求发送到服务器端的(即地址栏中#及以后的内容)。
2,可以通过window.location.hash属性获取和设置的哈希值。
3,如果注册onhashchange事件,设置散列值会触发事件。可以通过设置window.onhashchange注册事件监听器,也可以在主体元素上设置onhashchange属性注册。
4,window.location.hash值的变化会直接反应到浏览器地址栏(#后面的部分会发生变化)。
5,同时浏览器地址栏散列值的变化也会触发window.location.hash值的变化,从而触发onhashchange事件。
6,当浏览器地址栏中URL包含哈希如 http://www.baidu.com/#home,这时按下输入,浏览器发送http://www.baidu.com/请求至服务器,请求完毕之后设置散列值为#home,进而触发onhashchange事件。
7,当只改变浏览器地址栏URL的哈希部分,这时按下回车,浏览器不会发送任何请求至服务器,这时发生的只是设置散列值新修改的哈希值,并触发onhashchange事件。
8,html <a>标签属性href可以设置为页面的元素ID如#top,当点击该链接时页面跳转至该id元素所在区域,同时浏览器自动设置window.location.hash属性,同时地址栏哈希值发生改变,并触发onhashchange事件。
history
概述
window.history属性指向 History 对象,它表示当前窗口的浏览历史。
History 对象保存了当前窗口访问过的所有页面网址。下面代码表示当前窗口一共访问过3个网址。
window.history.length // 3由于安全原因,浏览器不允许脚本读取这些地址,但是允许在地址之间导航。
// 后退到前一个网址
history.back()

// 等同于
history.go(-1)
浏览器工具栏的“前进”和“后退”按钮,其实就是对 History 对象进行操作。
属性
History 对象主要有两个属性。
History.length:当前窗口访问过的网址数量(包括当前网页)History.state:History 堆栈最上层的状态值(详见下文)
// 当前窗口访问过多少个网页
window.history.length // 1

// History 对象的当前状态
// 通常是 undefined,即未设置
window.history.state // undefined
方法
History.back()、History.forward()、History.go()
这三个方法用于在历史之中移动。
History.back():移动到上一个网址,等同于点击浏览器的后退键。对于第一个访问的网址,该方法无效果。History.forward():移动到下一个网址,等同于点击浏览器的前进键。对于最后一个访问的网址,该方法无效果。History.go():接受一个整数作为参数,以当前网址为基准,移动到参数指定的网址,比如go(1)相当于forward(),go(-1)相当于back()。如果参数超过实际存在的网址范围,该方法无效果;如果不指定参数,默认参数为0,相当于刷新当前页面。
history.back();
history.forward();
history.go(-2);history.go(0)相当于刷新当前页面。
history.go(0); // 刷新当前页面注意,移动到以前访问过的页面时,页面通常是从浏览器缓存之中加载,而不是重新要求服务器发送新的网页。
History.pushState()
History.pushState()方法用于在历史中添加一条记录。
window.history.pushState(state, title, url)该方法接受三个参数,依次为:
state:一个与添加的记录相关联的状态对象,主要用于popstate事件。该事件触发时,该对象会传入回调函数。也就是说,浏览器会将这个对象序列化以后保留在本地,重新载入这个页面的时候,可以拿到这个对象。如果不需要这个对象,此处可以填null。title:新页面的标题。但是,现在所有浏览器都忽视这个参数,所以这里可以填空字符串。url:新的网址,必须与当前页面处在同一个域。浏览器的地址栏将显示这个网址。
假定当前网址是example.com/1.html,使用pushState()方法在浏览记录(History 对象)中添加一个新记录。
var stateObj = { foo: 'bar' };
history.pushState(stateObj, 'page 2', '2.html');添加新记录后,浏览器地址栏立刻显示example.com/2.html,但并不会跳转到2.html,甚至也不会检查2.html是否存在,它只是成为浏览历史中的最新记录。这时,在地址栏输入一个新的地址(比如访问google.com),然后点击了倒退按钮,页面的 URL 将显示2.html;你再点击一次倒退按钮,URL 将显示1.html。
总之,pushState()方法不会触发页面刷新,只是导致 History 对象发生变化,地址栏会有反应。
使用该方法之后,就可以用History.state属性读出状态对象。
var stateObj = { foo: 'bar' };
history.pushState(stateObj, 'page 2', '2.html');
history.state // {foo: "bar"}如果pushState的 URL 参数设置了一个新的锚点值(即hash),并不会触发hashchange事件。反过来,如果 URL 的锚点值变了,则会在 History 对象创建一条浏览记录。
如果pushState()方法设置了一个跨域网址,则会报错。
// 报错
// 当前网址为 http://example.com
history.pushState(null, '', 'https://twitter.com/hello');上面代码中,pushState想要插入一个跨域的网址,导致报错。这样设计的目的是,防止恶意代码让用户以为他们是在另一个网站上,因为这个方法不会导致页面跳转。
history.replaceState()
History.replaceState()方法用来修改 History 对象的当前记录,其他都与pushState()方法一模一样。
假定当前网页是example.com/example.html。
history.pushState({page: 1}, 'title 1', '?page=1')
// URL 显示为 http://example.com/example.html?page=1

history.pushState({page: 2}, 'title 2', '?page=2');
// URL 显示为 http://example.com/example.html?page=2

history.replaceState({page: 3}, 'title 3', '?page=3');
// URL 显示为 http://example.com/example.html?page=3

history.back()
// URL 显示为 http://example.com/example.html?page=1

history.back()
// URL 显示为 http://example.com/example.html

history.go(2)
// URL 显示为 http://example.com/example.html?page=3
popstate 事件
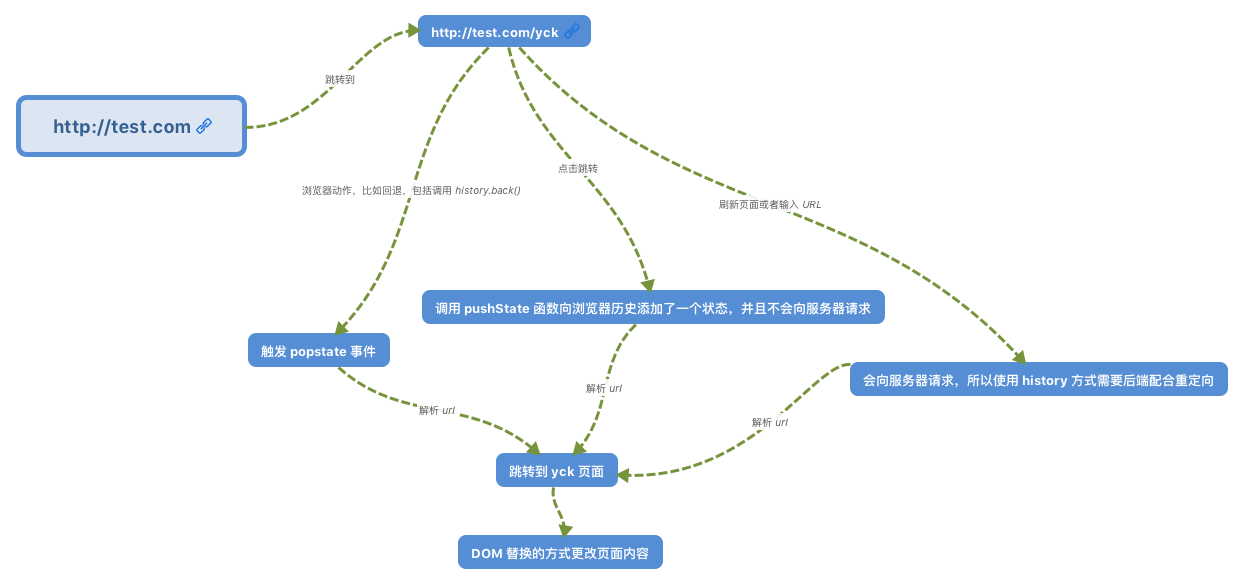
每当同一个文档的浏览历史(即history对象)出现变化时,就会触发popstate事件。
注意,仅仅调用pushState()方法或replaceState()方法 ,并不会触发该事件,只有用户点击浏览器倒退按钮和前进按钮,或者使用 JavaScript 调用History.back()、History.forward()、History.go()方法时才会触发。另外,该事件只针对同一个文档,如果浏览历史的切换,导致加载不同的文档,该事件也不会触发。
使用的时候,可以为popstate事件指定回调函数。
window.onpopstate = function (event) {
  console.log('location: ' + document.location);
  console.log('state: ' + JSON.stringify(event.state));
};

// 或者
window.addEventListener('popstate', function(event) {
  console.log('location: ' + document.location);
  console.log('state: ' + JSON.stringify(event.state));
});回调函数的参数是一个event事件对象,它的state属性指向pushState和replaceState方法为当前 URL 所提供的状态对象(即这两个方法的第一个参数)。上面代码中的event.state,就是通过pushState和replaceState方法,为当前 URL 绑定的state对象。
这个state对象也可以直接通过history对象读取。
var currentState = history.state;注意,页面第一次加载的时候,浏览器不会触发popstate事件。
实现
单页面应用利用了JavaScript动态变换网页内容,避免了页面重载;路由则提供了浏览器地址变化,网页内容也跟随变化,两者结合起来则为我们提供了体验良好的单页面web应用
前端路由实现方式
路由需要实现三个功能:
①浏览器地址变化,切换页面;
②点击浏览器【后退】、【前进】按钮,网页内容跟随变化;
③刷新浏览器,网页加载当前路由对应内容
在单页面web网页中, 单纯的浏览器地址改变, 网页不会重载, 如单纯的hash网址改变网页不会变化,因此我们的路由主要是通过监听事件, 并利用js实现动态改变网页内容,有两种实现方式:
hash路由: 监听浏览器地址hash值变化,执行相应的js切换网页history路由: 利用history API实现url地址改变, 网页内容改变
hash路由
首先定义一个Router类
class Router {
  constructor(obj) {
    // 路由模式
    this.mode = obj.mode
    // 配置路由
    this.routes = {
      '/index'              : 'views/index/index',
      '/index/detail'       : 'views/index/detail/detail',
      '/index/detail/more'  : 'views/index/detail/more/more',
      '/subscribe'          : 'views/subscribe/subscribe',
      '/proxy'              : 'views/proxy/proxy',
      '/state'              : 'views/state/stateDemo',
      '/state/sub'          : 'views/state/components/subState',
      '/dom'                : 'views/visualDom/visualDom',
      '/error'              : 'views/error/error'
    }
    this.init()
  }
}路由初始化init()时监听load,hashchange两个事件:
window.addEventListener('load', this.hashRefresh.bind(this), false);
window.addEventListener('hashchange', this.hashRefresh.bind(this), false);
浏览器地址hash值变化直接通过a标签链接实现
<nav id="nav" class="nav-tab">
  <ul class='tab'>
    <li><a class='nav-item' href="#/index">首页</a></li>
    <li><a class='nav-item' href="#/subscribe">观察者</a></li>
    <li><a class='nav-item' href="#/proxy">代理</a></li>
    <li><a class='nav-item' href="#/state">状态管理</a></li>
    <li><a class='nav-item' href="#/dom">虚拟DOM</a></li>
  </ul>
</nav>
<div id="container" class='container'>
  <div id="main" class='main'></div>
</div>
hash值变化后,回调方法:
/**
 * hash路由刷新执行
 */
hashRefresh() {
  // 获取当前路径,去掉查询字符串,默认'/index'
  var currentURL = location.hash.slice(1).split('?')[0] || '/index';
  this.name = this.routes[this.currentURL]
  this.controller(this.name)
}
/**
  * 组件控制器
  * @param {string} name
  */
controller(name) {
  // 获得相应组件
  var Component = require('../' + name).default;
  // 判断是否已经配置挂载元素,默认为$('#main')
  var controller = new Component($('#main'))
}
考虑到存在多级页面嵌套路由的存在,需要对嵌套路由进行处理:
- 直接子页面路由时,按父路由到子路由的顺序加载页面
- 父页面已经加载,再加载子页面时,父页面保留,只加载子页面
改造后的路由刷新方法为:
hashRefresh() {
  // 获取当前路径,去掉查询字符串,默认'/index'
  var currentURL = location.hash.slice(1).split('?')[0] || '/index';
  // 多级链接拆分为数组,遍历依次加载
  this.currentURLlist = currentURL.slice(1).split('/')
  this.url = ""
  this.currentURLlist.forEach((item, index) => {
    // 导航菜单激活显示
    if (index === 0) {
      this.navActive(item)
    }
    this.url += "/" + item
    this.name = this.routes[this.url]
    // 404页面处理
    if (!this.name) {
      location.href = '#/error'
      return false
    }
    // 对于嵌套路由的处理
    if (this.oldURL && this.oldURL[0]==this.currentURLlist[0]) {
      this.handleSubRouter(item,index)
    } else {
      this.controller(this.name)
    }
  });
  // 记录链接数组,后续处理子级组件
  this.oldURL = JSON.parse(JSON.stringify(this.currentURLlist))
}
/**
  * 处理嵌套路由
  * @param {string} item 链接list中当前项
  * @param {number} index 链接list中当前索引
  */
handleSubRouter(item,index){
  // 新路由是旧路由的子级
  if (this.oldURL.length < this.currentURLlist.length) {
    // 相同路由部分不重新加载
    if (item !== this.oldURL[index]) {
      this.controller(this.name)
    }
  }
  // 新路由是旧路由的父级
  if (this.oldURL.length > this.currentURLlist.length) {
    var len = Math.min(this.oldURL.length, this.currentURLlist.length)
    // 只重新加载最后一个路由
    if (index == len - 1) {
      this.controller(this.name)
    }
  }
}
这样,一个hash路由组件就实现了。
使用时,只需new一个Router实例即可:new Router({mode:'hash'})
history 路由
window.history属性指向 History 对象,是浏览器的一个属性,表示当前窗口的浏览历史,History 对象保存了当前窗口访问过的所有页面地址。
webpack开发环境下,需要在devServer对象添加以下配置:
historyApiFallback: {
  rewrites: [
    { from: /.*/, to: path.posix.join(config.dev.assetsPublicPath, 'index.html') },
  ],
}
history路由主要是通过history.pushState()方法向浏览记录中添加一条历史记录,并同时触发js回调加载页面
当【前进】、【后退】时,会触发history.popstate 事件,加载history.state中存放的路径
history路由实现与hash路由的步骤类似,由于需要配置路由模式切换,页面中所有的a链接都采用了hash类型链接,history路由初始化时,需要拦截a标签的默认跳转:
  /**
   * history模式劫持 a链接
   */
  bindLink() {
    $('#nav').on('click', 'a.nav-item', this.handleLink.bind(this))
  }
 /**
   * history 处理a链接
   * @param  e 当前对象Event
   */
  handleLink(e) {
    e.preventDefault();
    // 获取元素路径属性
    let href = $(e.target).attr('href')
    // 对非路由链接直接跳转
    if (href.slice(0, 1) !== '#') {
      window.location.href = href
    } else {
      let path = href.slice(1)
      history.pushState({
        path: path
      }, null, path)
      // 加载相应页面
      this.loadView(path.split('?')[0])
    }
}history路由初始化需要绑定load、popstate事件
this.bindLink()
window.addEventListener('load', this.loadView.bind(this, location.pathname));
window.addEventListener('popstate', this.historyRefresh.bind(this));浏览是【前进】或【后退】时,触发popstate事件,执行回调函数
/**
  * history模式刷新页面
  * @param  e  当前对象Event
  */
historyRefresh(e) {
  const state = e.state || {}
  const path = state.path.split('?')[0] || null
  if (path) {
    this.loadView(path)
  }
}history路由模式首次加载页面时,可以默认一个页面,这时可以用history.replaceState方法
if (this.mode === 'history' && currentURL === '/') {
  history.replaceState({path: '/'}, null, '/')
  currentURL = '/index'
}
对于404页面的处理,也类似
history.replaceState({path: '/error'}, null, '/error')
this.loadView('/error')
github代码
import store from '@/common/lib/store/store'
export default class Router {
  constructor(obj) {
    this.mode = obj.mode
    // this.mode = 'history'
    // 路由配置
    this.routes = {
      '/index': 'views/index/index',
      '/index/detail': 'views/index/detail/detail',
      '/index/detail/more': 'views/index/detail/more/more',
      '/design': 'views/design',
      '/design/subscribe': 'views/design/subscribe/index',
      '/design/proxy': 'views/design/proxy/index',
      '/design/login': 'views/design/login',
      '/state': 'views/state/stateDemo',
      '/state/sub': 'views/state/components/subState',
      '/dom': 'views/visualDom/visualDom',
      '/mvvm': 'views/mvvm/mvvm',
      '/algorithm': 'views/algorithm',
      '/algorithm/bubbleSort': 'views/algorithm/bubbleSort',
      '/layout': 'views/layout',
      '/layout/three': 'views/layout/three/ThreeAdapt',
      '/layout/vetically': 'views/layout/vetically/Vetically',
      '/toExcel': 'views/toExcel',
      '/h5live': 'views/h5live',
      '/data': 'views/dataStructure',
      '/data/stack': 'views/dataStructure/stack/stack',
      '/data/queue': 'views/dataStructure/queue/queue',
      '/error': 'views/error/error'
    }
    // 组件挂载根元素
    this.root = $('#main')
    // 导航菜单列表
    this.navList = $('.tab .nav-item')
    this.init()
  }
  init() {
    if (this.mode === 'hash') {
      window.addEventListener('load', this.hashRefresh.bind(this), false);
      window.addEventListener('hashchange', this.hashRefresh.bind(this), false);
    } else {
      this.bindLink()
      window.addEventListener('load', this.loadView.bind(this, location.pathname));
      window.addEventListener('popstate', this.historyRefresh.bind(this));
    }
  }
  /**
   * history模式劫持 a链接
   */
  bindLink() {
    $('#nav').on('click', 'a.nav-item', this.handleLink.bind(this))
  }
  /**
   * history 处理a链接
   * @param  e 当前对象Event
   */
  handleLink(e) {
    e.preventDefault();
    // 获取元素路径属性
    let href = $(e.target).attr('href')
    // 对非路由链接直接跳转
    if (href.slice(0, 1) !== '#') {
      window.location.href = href
    } else {
      let path = href.slice(1)
      history.pushState({
        path: path
      }, null, path)
      // 加载相应页面
      this.loadView(path.split('?')[0])
    }
  }
  /**
   * hash路由刷新执行
   * @param {object} e
   */
  hashRefresh(e) {
    if (e.newURL) {
      var newURL = e.newURL.split('#')[1];
      var oldURL = e.oldURL.split('#')[1];
      console.dir({
        oldURL: oldURL,
        newURL: newURL
      })
    }
    // 获取当前路径,默认'/index'
    var currentURL = location.hash.slice(1).split('?')[0] || '/index';
    this.loadView(currentURL)
  }
  /**
   * history模式刷新页面
   * @param  e  当前对象Event
   */
  historyRefresh(e) {
    const state = e.state || {}
    const path = state.path.split('?')[0] || null
    if (path) {
      this.loadView(path)
    }
  }
  /**
   * 加载页面
   * @param {string} currentURL
   */
  loadView(currentURL) {
    if (this.mode === 'history' && currentURL === '/') {
      history.replaceState({
        path: '/'
      }, null, '/')
      currentURL = '/index'
    }
    // 多级链接拆分为数组,遍历依次加载
    this.currentURLlist = currentURL.slice(1).split('/')
    this.url = ""
    this.currentURLlist.forEach((item, index) => {
      // 导航菜单激活显示
      if (index === 0) {
        this.navActive(item)
      }
      this.url += "/" + item
      this.name = this.routes[this.url]
      // 404页面处理
      if (!this.name) {
        this.errorPage()
        return false
      }
      // 对于嵌套路由的处理
      if (this.oldURL && this.oldURL[index] == this.currentURLlist[index]) {
        this.handleSubRouter(item, index)
      } else {
        this.controller(this.name)
        if (this.oldURL && this.oldURL[0] != this.currentURLlist[0]) {
          console.log('解绑状态监听事件')
          store.getSubject().unsubscribe('stateChange')
        }

      }
    });
    // 记录链接数组,后续处理子级组件
    this.oldURL = JSON.parse(JSON.stringify(this.currentURLlist))
  }
  /**
   * 处理嵌套路由
   * @param {string} item 链接list中当前项
   * @param {number} index 链接list中当前索引
   */
  handleSubRouter(item, index) {
    // 新路由是旧路由的子级
    if (this.oldURL.length < this.currentURLlist.length) {
      // 相同路由部分不重新加载
      if (item !== this.oldURL[index]) {
        this.controller(this.name)
        console.log('解绑状态监听事件')
        store.getSubject().unsubscribe('stateChange')
      }
    }
    // 新路由是旧路由的父级
    if (this.oldURL.length > this.currentURLlist.length) {
      var len = Math.min(this.oldURL.length, this.currentURLlist.length)
      // 只重新加载最后一个路由
      if (index == len - 1) {
        this.controller(this.name)
      }
    }
  }
  /**
   * 404页面处理
   */
  errorPage() {
    if (this.mode === 'hash') {
      location.href = '#/error'
    } else {
      history.replaceState({
        path: '/error'
      }, null, '/error')
      this.loadView('/error')
    }
  }
  /**
   * 组件控制器
   * @param {string} name
   */
  controller(name) {
    console.log('加载页面', this.url)
    // var Component = require('../' + name).default;
    // var controller = new Component($('#main'))
    // this.bindEvents.call(controller)
    // import 函数会返回一个 Promise对象
    var Component = () => import('../' + name);
    Component().then(resp => {
      // resp.default.prototype.router = this.url
      this.component = new resp.default(this.root)
      this.component.$el = this.component.$el || this.component.$root.children().first()
      this.bindEvents.call(this.component)
      // history模式下 每次组件切换都绑定所有的链接进行处理
      if (this.mode === 'history') {
        $("#main").find('a[href]').unbind('click').on('click', this.handleLink.bind(this))
      }
    })
  }
  /**
   * 手动跳转路由
   * @param {string} path
   */
  push(path) {
    if (this.mode === 'hash') {
      location.hash = '#' + path
    } else {
      history.pushState({
        path: path
      }, null, path)
      // 加载相应页面
      this.loadView(path.split('?')[0])
    }
  }
  /**
   * 绑定组件对象中events 事件
   * @desc 将组件对象中this通过call绑定
   * ! 仅支持绑定当前组件下的DOM事件
   */
  bindEvents() {
    var self = this;
    //eventType: 事件类型;selector: 事件作用对象;handleEvent: 事件执行方法
    var eventType = "",
      selector = "",
      handleEvent = "";
    var Event = function (eventType, selector, handleEvent) {
      self.$el.find(selector).on(eventType, (e) => {
        // 执行事件
        self[handleEvent](e)
      })
    }
    // 遍历events对象
    for (var index in self.events) {
      eventType = index.match(/[0-9A-Za-z]+\s/i)[0].trim(); // 匹配事件名
      selector = index.replace(/[0-9A-Za-z]+\s/i, "").trim(); // 匹配事件作用元素选择器
      handleEvent = self.events[index]; // 匹配处理事件名称
      var obj = new Event(eventType, selector, handleEvent);
      obj = null; // 用完即释放空间
    }
    Event = null
  }
  /**
   * 导航激活显示
   * @param  item 当前router对象
   */
  navActive(item) {
    for (var i = 0; i < this.navList.length; i++) {
      $(this.navList[i]).removeClass('active')
      if ($(this.navList[i]).attr('href').slice(2) === item) {
        $(this.navList[i]).addClass('active')
      }
    }
  }
}
作者对主题的挖掘深入骨髓,展现了非凡的洞察力和理解力。
《协商王第四季》日韩综艺高清在线免费观看:https://www.jgz518.com/xingkong/165628.html
《纽约五尖塔》剧情片高清在线免费观看:https://www.jgz518.com/xingkong/152096.html
你的文章充满了智慧,让人敬佩。 https://www.4006400989.com/qyvideo/11425.html
《美人鱼第三季》欧美剧高清在线免费观看:https://www.jgz518.com/xingkong/22402.html
你的文章让我心情愉悦,真是太棒了! http://www.55baobei.com/I04fVg9Tqj.html
你的文章让我心情愉悦,真是太棒了! http://www.55baobei.com/aikaZoDDJb.html
《天赐情缘》爱情片高清在线免费观看:https://www.jgz518.com/xingkong/93264.html
《零异频道第二季》欧美剧高清在线免费观看:https://www.jgz518.com/xingkong/113884.html
你的文章充满了欢乐,让人忍不住一笑。 https://www.4006400989.com/qyvideo/97631.html
《忘川序》国产剧高清在线免费观看:https://www.jgz518.com/xingkong/31249.html
想想你的文章写的特别好www.jiwenlaw.com